Upgrade
PDF Hacks

How to Crop PDF in 4 Easy Ways

Huge chunks of white spaces called margins or borders are set by default in documents and PDF files. These borders are optional and can be adjusted in editable document applications such as Microsoft Word, however, if the file is already converted into non-editable formats, there is no way a reader will be able to adjust the visible areas in the same way when it was first created. Though this is the case, there#38;rsquo;s a way around setting this up using other tools online and offline. There are four easy ways to do this and it will only take you a few minutes to accomplish it using offline tools Adobe Acrobat#38;nbsp;and#38;nbsp;Microsoft Word or more conveniently, you can just use a free PDF editor online like DeftPDF.

#38;nbsp;

Using Adobe Acrobat to remove white spaces

Adobe has certainly made sure that the file format they created is steady and secure but the flip side of these steady files has also made sure that editors will have a harder time to adjust. What kind of solution would this file type be if without an application to help, right? So as a basic standard, the makers have also created Adobe Acrobat, a reader and an editor that has the standard tools to make these adjustments possible which you can simply download online. The whole user experience, of course, comes with a price, hence allowing only a few tools for its free version.#38;nbsp; But if you already have it installed and you are already subscribed to their monthly fees, here#38;rsquo;s how you can use the tool to remove the white space dilemma.

#38;nbsp;

Adobe Acrobat Crop Tool

The beauty of cropping tools is the fact that you can set your own visibility area. If there are corrections in the document, you can simply exclude them in your selections. So how should we do it?

Step one: Open your PDF file in your Adobe Acrobat reader and click #38;ldquo;Tools#38;rdquo; at the top of the secondary menu. This will show you a bunch of tools that you will enable you to use. Choose #38;ldquo;Edit PDF#38;rdquo; and click #38;ldquo;Crop Page.#38;rdquo;

DeftPDF adobe acrobat tools

Step two: A rectangular cropping tool will appear and allow you to highlight the area that you wish to be visible. When your page is set to your standards, double click inside the selected area and indicate the measurements that you want for your margins on the dialogue box that will open.

Step three: Apply these changes to all the pages (if preferred) by clicking #38;ldquo;All#38;rdquo; on the #38;ldquo;Page range.#38;rdquo; Once all is set, click #38;ldquo;ok#38;rdquo; and the process of cropping your document will begin.

#38;nbsp;

Adobe Acrobat Print production tool

There#38;rsquo;s also another way to remove the white margins but this time, it won#38;rsquo;t let you select the visible area. This guide that we#38;rsquo;re about to show you is only a shorter way to use Adobe Acrobat and focus on removing margins when printing #38;ndash; just margins, nothing else!

Step one: Open your #38;ldquo;Tools#38;rdquo; again by clicking the tab at the top. Click #38;ldquo;Print production#38;rdquo; to set your margins as preferred.

DeftPDF Print Production Adobe

Step two: A pop-up window will appear indicating the #38;ldquo;Set Page boxes#38;rdquo; and will allow you to look into your #38;ldquo;Margin controls.#38;rdquo; Here you will need to select #38;ldquo;Remove white margins.#38;rdquo;

Step three: Remove all white margins in all your pages by selecting #38;ldquo;All#38;rdquo; on the #38;ldquo;Page range.#38;rdquo; Print your PDF files as you have set it.

#38;nbsp;

Using DeftPDF to crop PDF online

When it#38;rsquo;s subscriptions we#38;rsquo;re talking about, it#38;rsquo;s not worth it if it's only used for one document and we could understand that. So, here#38;rsquo;s another workaround on how you will be able to achieve the same cropping standards without having to pay or installing anything!

Step one:#38;nbsp; Go to DeftPDF.com online using your regular browser.

Step two: Select #38;ldquo;All tools#38;rdquo; and choose #38;ldquo;Crop#38;rdquo; from the menu

DeftPDF crop tool

Step three: Upload your PDF file online and choose from the selection #38;ndash; #38;ldquo;Crop whole document#38;rdquo; or #38;ldquo;Crop pages individually.#38;rdquo; Choose #38;ldquo;the whole document#38;rdquo; if you want all pages to be cropped the same way. Once it#38;rsquo;s on preview, use your cross cursor to select the area you wish to be visible.

Step four: Click #38;ldquo;Crop PDF#38;rdquo; to process your document. A pop-up window will appear and will let you save by #38;ldquo;Download,#38;rdquo;#38;nbsp;save through online accounts or print and share. Choose the method preferred and you#38;rsquo;re ready to go!#38;nbsp;

DeftPDF crop and save

#38;nbsp;

Using the Snippet tool and Microsoft Word

So, there#38;rsquo;s no internet and you couldn#38;rsquo;t get a hold of DeftPDF to crop PDF online, what else is there to use to be able to remove these white spaces? Well here#38;rsquo;s a caveman way of doing it, a method that could really say working your way around. Simple default tools will be used in this guide and all you need is your snippet tool and your word application.

Step one: Open your PDF document on your default reader #38;ndash; it could be your browser or your free version of your Adobe Reader. View the page you want to crop on your PDF file.

Step two: Click your Windows logo and open your #38;ldquo;Snipping Tool.#38;rdquo; A window will appear for your snipping tool application.

DeftPDF windows snipping tool

Step three: To select an area on your document, click #38;ldquo;Mode#38;rdquo; and select #38;ldquo;rectangular snip.#38;rdquo; Start selecting the text you want to be cropped using your cross cursor. Your cropped document will automatically appear in another window once you have finished selecting the area. Save your cropped document and repeat the process if you have other texts you want to crop. Note that the document you just cropped will be saved as a PNG or a JPG.

DeftPDF windows snipping rectangle

Step four: Open your word application and insert your cropped document as a picture. Adjust your photos and margins according to your preference. Make sure to change your photo#38;rsquo;s wrap text settings to allow you to freely move the photo. You can do this by clicking the photo, select #38;ldquo;format#38;rdquo; in the menu and click the wrap text dropdown list. Select #38;ldquo;In front of text#38;rdquo; to allow you to move it around.

DeftPDF wrap text microsoft word

Step Five: Once done, save your document as a PDF file. Make sure you click #38;ldquo;Save as#38;rdquo; and select #38;ldquo;PDF#38;rdquo; when you save it.

DeftPDF save as in word as PDF

Cropping your way out

Using PDF formats aren#38;rsquo;t hard to edit or convert if you have the right tools and you know where to go. The benefit of using online tools is the fact that it's hassle-free, subscription free and no need for installations that#38;rsquo;s why we highly recommend you try DeftPDF online. Not all online PDF solutions are free though, some have limitations and requires subscription fees so go give our tool a shot and try it here - https://deftpdf.com/crop-pdf

Published 29 Apr 2019

Huge chunks of white spaces called margins or borders are set by default in documents and PDF files. These borders are optional and can be adjusted in editable document applications such as Microsoft Word, however, if the file is already converted into non-editable formats, there is no way a reader will be able to adjust the visible areas in the same way when it was first created. Though this is the case, there’s a way around setting this up using other tools online and offline. There are four easy ways to do this and it will only take you a few minutes to accomplish it using offline tools Adobe Acrobat and Microsoft Word or more conveniently, you can just use a free PDF editor online like DeftPDF.

Using Adobe Acrobat to remove white spaces

Adobe has certainly made sure that the file format they created is steady and secure but the flip side of these steady files has also made sure that editors will have a harder time to adjust. What kind of solution would this file type be if without an application to help, right? So as a basic standard, the makers have also created Adobe Acrobat, a reader and an editor that has the standard tools to make these adjustments possible which you can simply download online. The whole user experience, of course, comes with a price, hence allowing only a few tools for its free version.  But if you already have it installed and you are already subscribed to their monthly fees, here’s how you can use the tool to remove the white space dilemma.

Adobe Acrobat Crop Tool

The beauty of cropping tools is the fact that you can set your own visibility area. If there are corrections in the document, you can simply exclude them in your selections. So how should we do it?

Step one: Open your PDF file in your Adobe Acrobat reader and click “Tools” at the top of the secondary menu. This will show you a bunch of tools that you will enable you to use. Choose “Edit PDF” and click “Crop Page.”
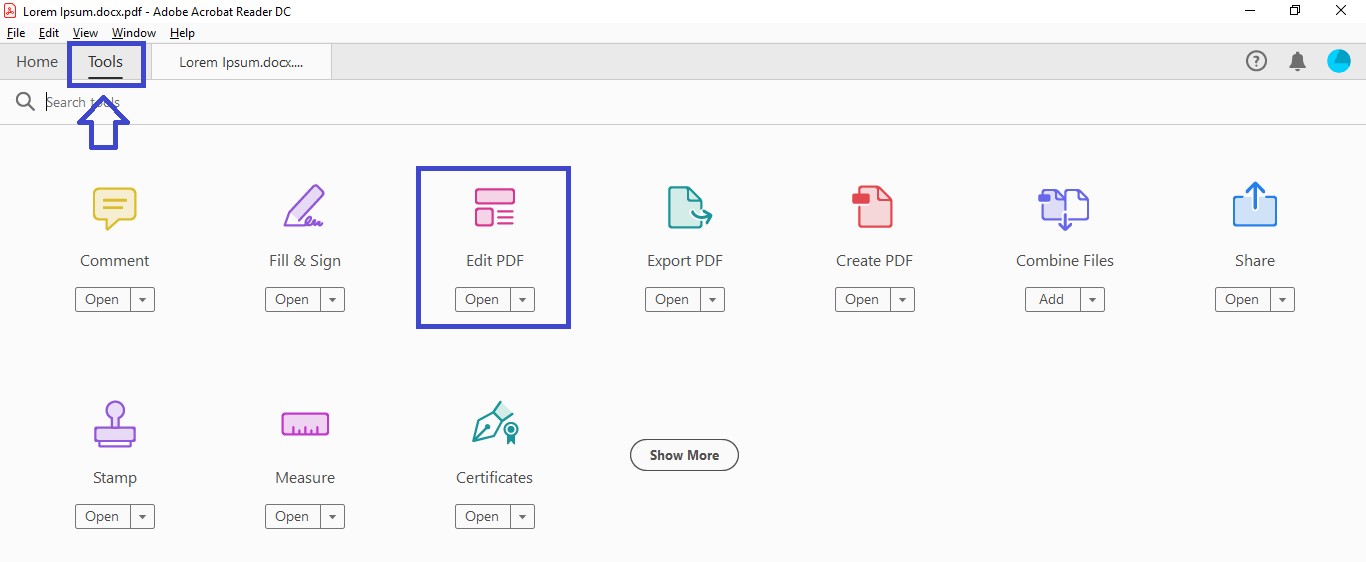
DeftPDF Adobe acrobat tools

Step two: A rectangular cropping tool will appear and allow you to highlight the area that you wish to be visible. When your page is set to your standards, double click inside the selected area and indicate the measurements that you want for your margins on the dialogue box that will open.

Step three: Apply these changes to all the pages (if preferred) by clicking “All” on the “Page range.” Once all is set, click “ok” and the process of cropping your document will begin.

Adobe Acrobat Print production tool

There’s also another way to remove the white margins but this time, it won’t let you select the visible area. This guide that we’re about to show you is only a shorter way to use Adobe Acrobat and focus on removing margins when printing – just margins, nothing else!

Step one: Open your “Tools” again by clicking the tab at the top. Click “Print production” to set your margins as preferred.
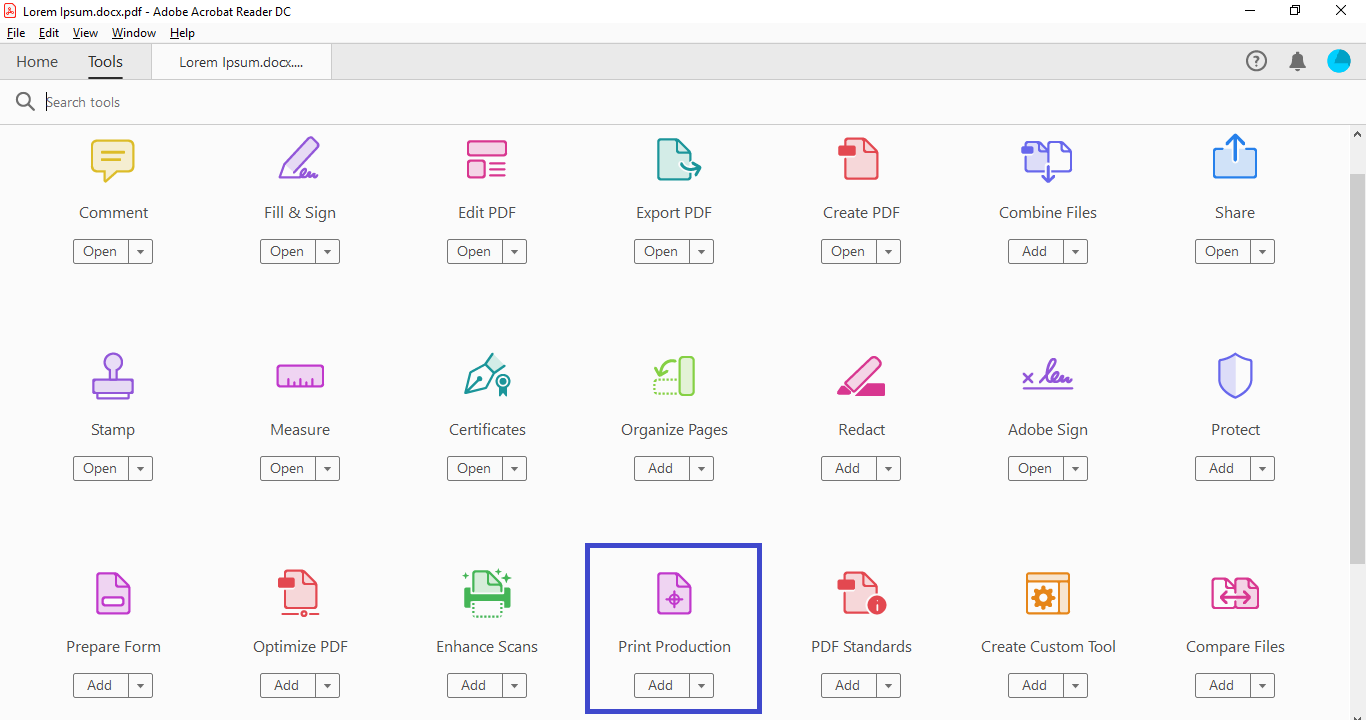
DeftPDF Print Production Adobe

Step two: A pop-up window will appear indicating the “Set Page boxes” and will allow you to look into your “Margin controls.” Here you will need to select “Remove white margins.”

Step three: Remove all white margins in all your pages by selecting “All” on the “Page range.” Print your PDF files as you have set it.

Using DeftPDF to crop PDF online

When it’s subscriptions we’re talking about, it’s not worth it if it's only used for one document and we could understand that. So, here’s another workaround on how you will be able to achieve the same cropping standards without having to pay or installing anything!

Step one:  Go to DeftPDF.com online using your regular browser.

Step two: Select “All tools” and choose “Crop” from the menu
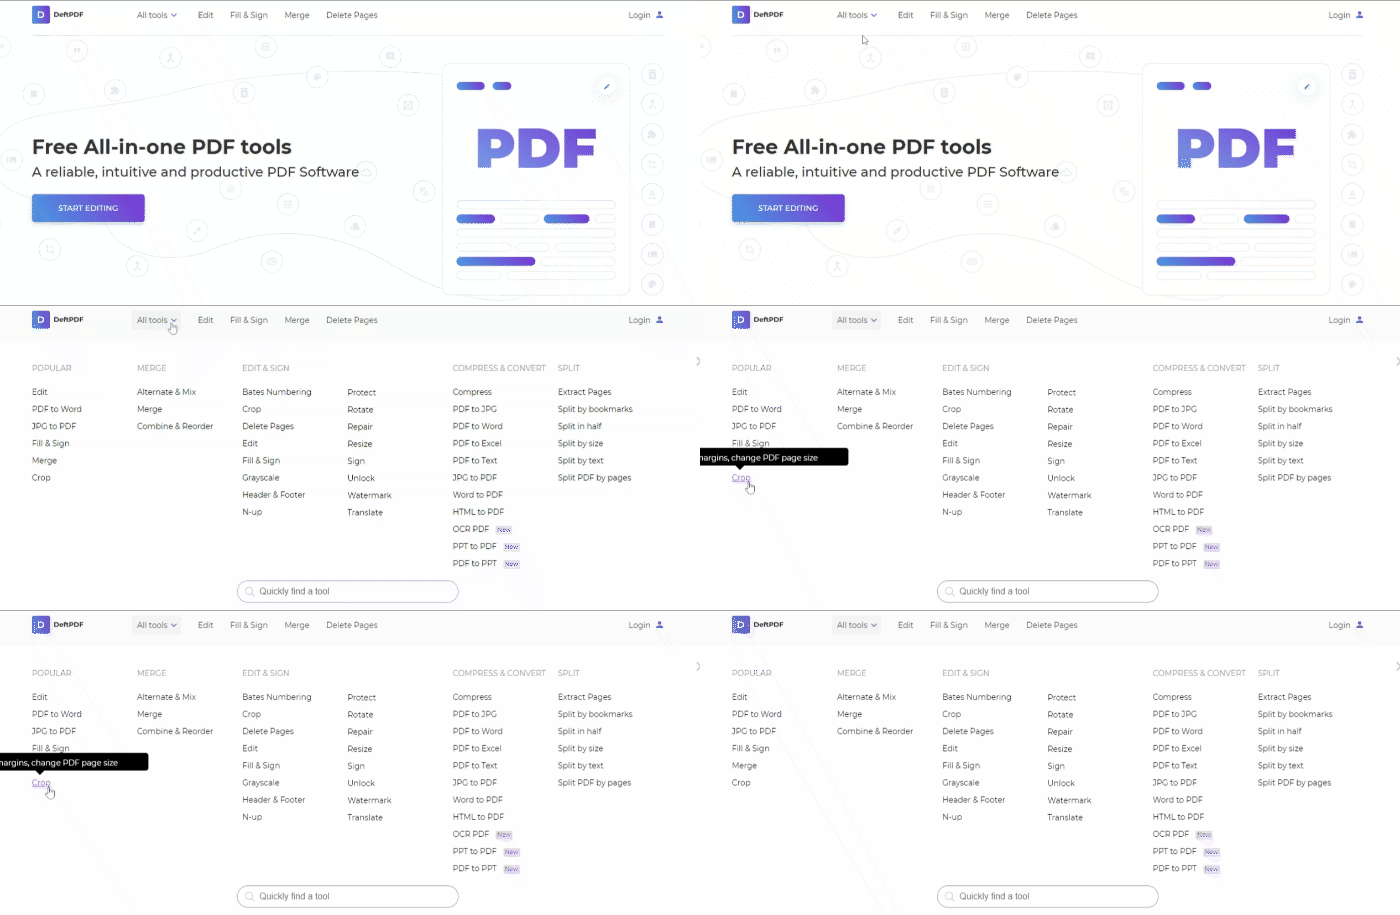
DeftPDF crop tool

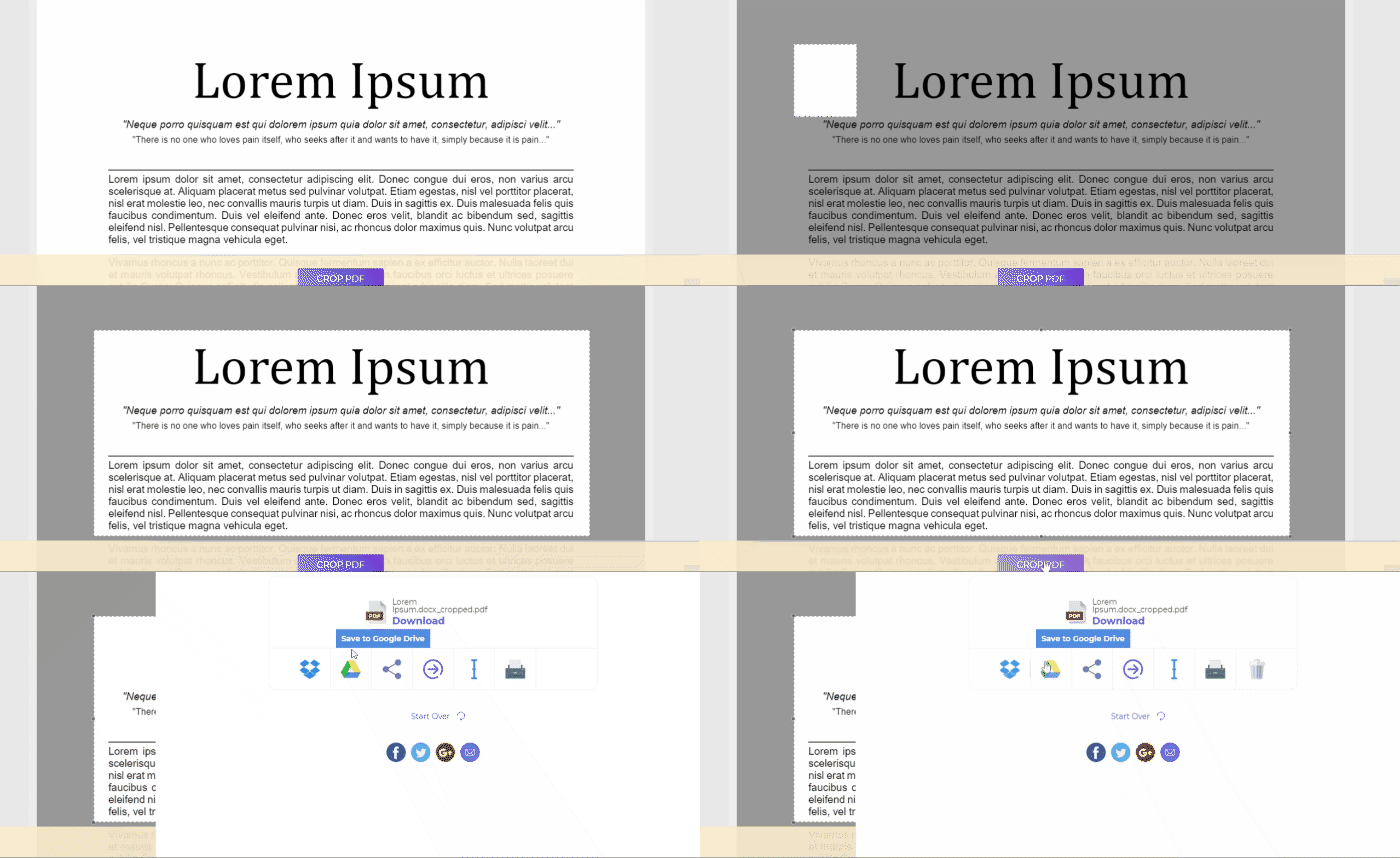
Step three: Upload your PDF file online and choose from the selection – “Crop whole document” or “Crop pages individually.” Choose “the whole document” if you want all pages to be cropped the same way. Once it’s on preview, use your cross cursor to select the area you wish to be visible.

Step four: Click “Crop PDF” to process your document. A pop-up window will appear and will let you save by “Download,” save through online accounts or print and share. Choose the method preferred and you’re ready to go!
DeftPDF crop and save

Using the Snippet tool and Microsoft Word

So, there’s no internet and you couldn’t get a hold of DeftPDF to crop PDF online, what else is there to use to be able to remove these white spaces? Well here’s a caveman way of doing it, a method that could really say working your way around. Simple default tools will be used in this guide and all you need is your snippet tool and your word application.

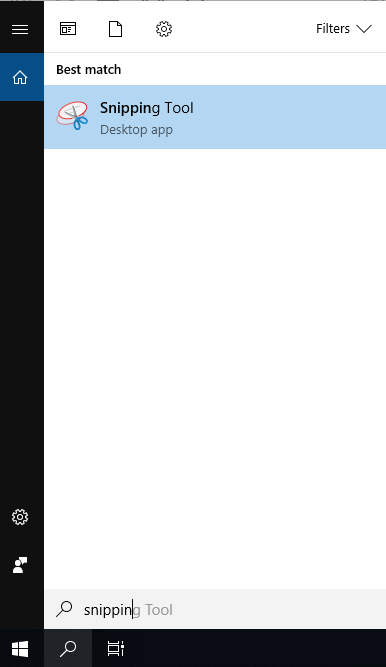
Step one: Open your PDF document on your default reader – it could be your browser or your free version of your Adobe Reader. View the page you want to crop on your PDF file.

Step two: Click your Windows logo and open your “Snipping Tool.” A window will appear for your snipping tool application.
DeftPDF Windows snipping tool

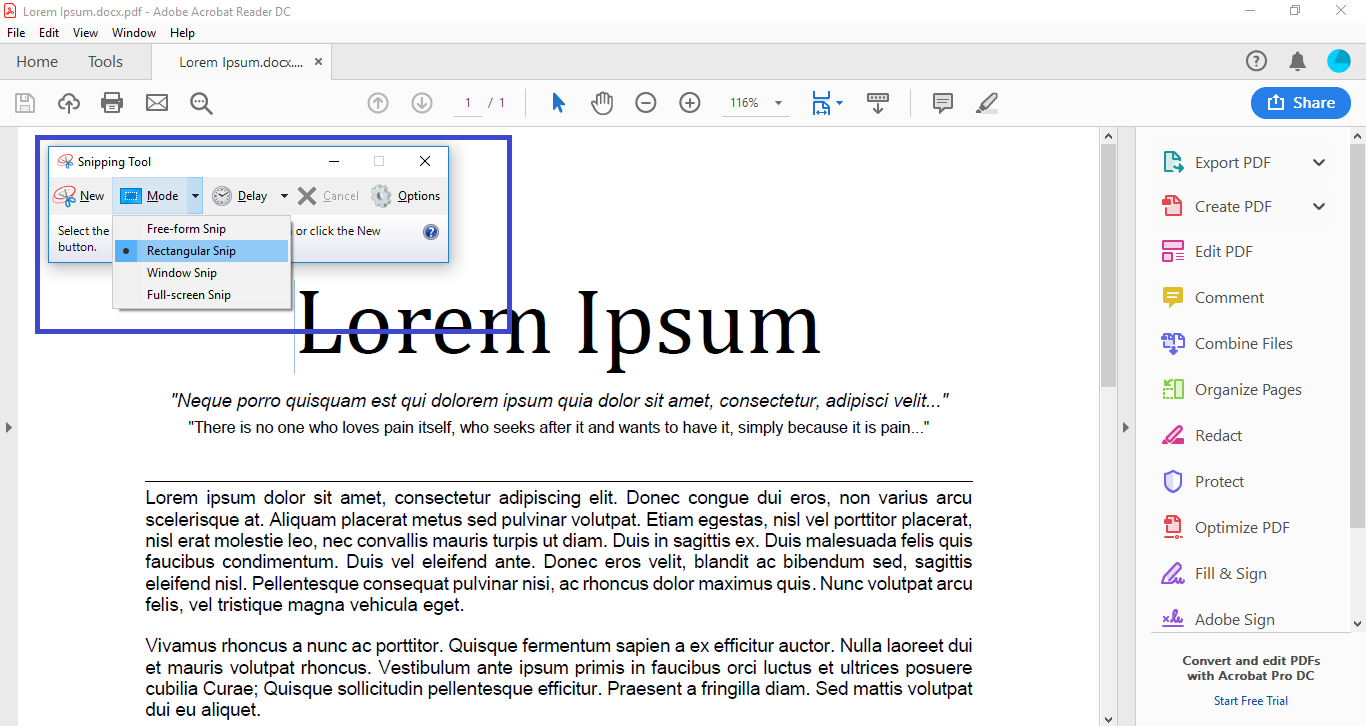
Step three: To select an area on your document, click “Mode” and select “rectangular snip.” Start selecting the text you want to be cropped using your cross cursor. Your cropped document will automatically appear in another window once you have finished selecting the area. Save your cropped document and repeat the process if you have other texts you want to crop. Note that the document you just cropped will be saved as a PNG or a JPG.
DeftPDF Windows snipping tool

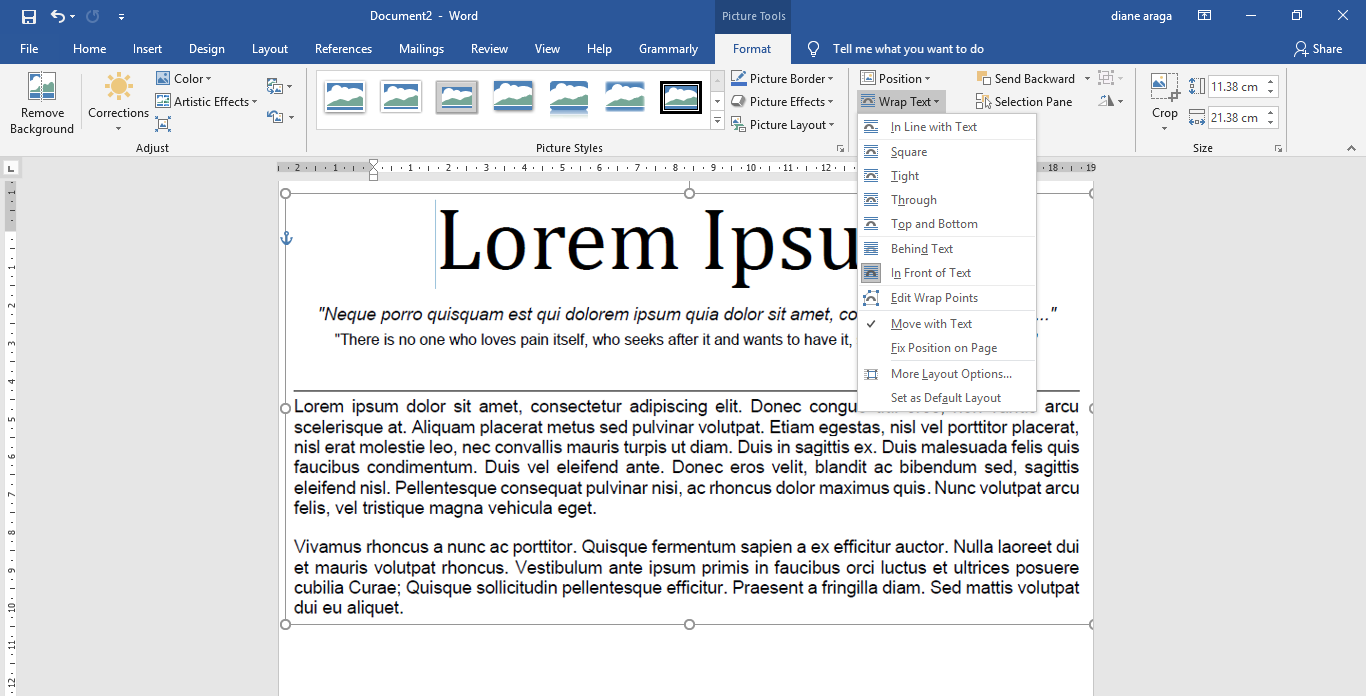
Step four: Open your word application and insert your cropped document as a picture. Adjust your photos and margins according to your preference. Make sure to change your photo’s wrap text settings to allow you to freely move the photo. You can do this by clicking the photo, select “format” in the menu and click the wrap text dropdown list. Select “In front of text” to allow you to move it around.
DeftPDF wrap text microsoft word

Step Five: Once done, save your document as a PDF file. Make sure you click “Save as” and select “PDF” when you save it.
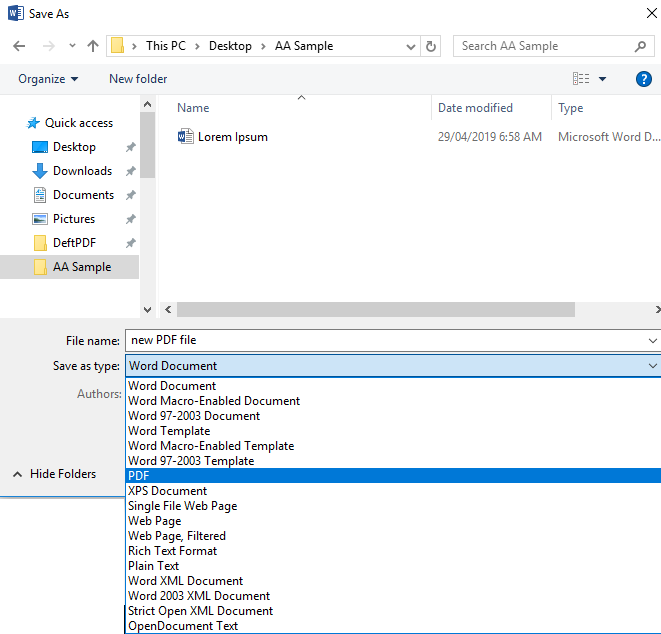
DeftPDF save as in word as PDF

Cropping your way out

Using PDF formats aren’t hard to edit or convert if you have the right tools and you know where to go. The benefit of using online tools is the fact that it's hassle-free, subscription free and no need for installations that’s why we highly recommend you try DeftPDF online. Not all online PDF solutions are free though, some have limitations and requires subscription fees so go give our tool a shot and try it here - https://deftpdf.com/crop-pdf


Want to get updates and subscribe to our blog? Get weekly e-notifications by creating a free account with us:  DeftPDF online

close
close
close